
You’re probably aware of how crucial it is to have your basement waterproofed, but do you know about our proven 3-step process? First, we’ll assess your basement, identifying the sources of moisture. Then, we’ll tackle those issues head-on, using state-of-the-art techniques to ensure your basement stays dry. Finally, we don’t just leave you high and dry – we’ll stick around to ensure our solution stands the test of time. Intrigued? There’s so much more to learn about how this process could be the solution you’ve been looking for.
Key Takeaways
- Step 1 involves an initial basement assessment that identifies potential water sources, checks drainage systems, and prioritizes repairs.
- In Step 2, waterproofing solutions are implemented, including establishing effective drainage systems and installing moisture barriers and sump pumps.
- The selection of suitable waterproofing materials based on longevity, performance, and cost is also a crucial part of Step 2.
- Step 3 includes the application of chosen waterproofing materials after a final inspection and effective testing for sealant performance.
- Continuous maintenance and monitoring, including routine inspections and quick responses to potential leaks, ensure long-term effectiveness of the waterproofing process.
Understanding Basement Water Issues
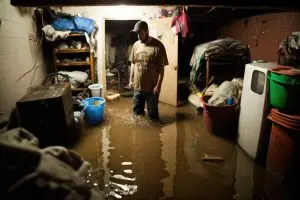
A staggering number of homes face basement water issues, which can lead to severe structural problems if not addressed properly. You must understand the various water sources: rain, underground water, and even humidity.
Moisture detection is key in identifying these issues. Look out for wet spots, condensation on walls, or a musty smell.
Foundation cracks are another common water entry point. Seasonal changes can cause the soil composition around your home to expand and contract, leading to these cracks.
Also, poor drainage systems can exacerbate moisture problems. Ensure your gutters and downspouts are diverting water away from your home’s foundation.
Humidity control is another significant factor. High humidity can lead to condensation, which can cause mold and mildew. Dehumidifiers can help reduce moisture levels.
Lastly, consider the landscaping impact. The slope of your yard can direct water towards your home, increasing basement water issues.
Therefore, thoughtful landscaping can help protect your basement from water issues.
Understanding these factors will help you in addressing your basement water problems effectively. Remember, identifying the issues is the first step towards a healthier, drier basement.
Importance of Waterproofing Your Basement
Having grasped the various factors contributing to basement water issues, it’s time to consider waterproofing as a practical solution to these problems.
Waterproofing isn’t just an option; it’s a necessity that provides immense benefits.
You might be asking, “Why should I waterproof my basement?” First, think about the benefits longevity brings. A waterproofed basement extends your home’s lifespan, protecting its structural integrity from damaging moisture and water intrusions. This avoids costly repairs down the line and maintains your property’s value.
Next, consider moisture control. A damp basement is the perfect breeding ground for mold and mildew, which can lead to health issues for you and your family. Waterproofing keeps the basement dry, eliminating the potential for these harmful growths.
Moreover, a waterproofed basement transforms a damp, unusable space into a functional one. It can be an extra living area, a playroom, or a storage space, increasing the usable square footage of your home.
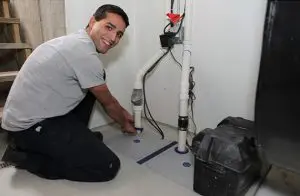
Step 1: Initial Basement Assessment
Before you dive into the waterproofing process, it’s crucial to conduct an initial assessment of your basement. This initial step allows you to identify potential issues and set the stage for successful moisture control.
Start your inspection by examining your basement’s drainage system. Over time, basement drainage can become clogged or ineffective, contributing to potential water damage.
Don’t overlook any standing water or damp spots as these are clear signs of drainage issues. Make a note of where these problems are located as it will help in the next stages of the waterproofing process.
Next, you’ll want to identify any sources of moisture. This could be anything from leaky pipes to cracks in the walls or floor where water can seep in.
Tools Required for Waterproofing
Before you start the waterproofing process, it’s crucial to have the right tools at your disposal.
We’ll explore essential waterproofing tools, their functionalities, and how to use them effectively.
Safety precautions when using these tools will also be a key part of our discussion.
Essential Waterproofing Tools
To ensure a successful waterproofing process, you’ll need the right tools in your arsenal. As you learn various waterproofing techniques, you’ll realize that having the essential equipment makes the job easier and more efficient.
Here’s a quick look at some of the tools you’ll need:
| Essential Equipment | Purpose | Used In |
|---|---|---|
| Water Pump | To remove excess water | All Techniques |
| Paintbrush | To apply waterproofing solutions | Sealants and Coatings |
| Hammer Drill | To create holes for water drains | Interior/Exterior Drainage |
| Utility Knife | To cut waterproofing membrane | Membrane Installations |
These tools play a critical role in the waterproofing process, each with its own specific function in different techniques. The water pump, for instance, is universally necessary. A paintbrush, on the other hand, finds its use in techniques involving sealants and coatings.
Tool Functionality and Use
Understanding how each tool functions and when to use it can significantly streamline your basement waterproofing project. Familiarize yourself with different tool types like roller brushes for applying sealant, caulk guns for gaps, moisture meters for detecting dampness, and sump pumps for water removal.
Each tool type has a specific function. Roller brushes ensure an even spread of sealant, while caulk guns help fill in gaps and cracks. Moisture meters can pinpoint damp areas, guiding you where to focus your efforts, and sump pumps expel accumulated water. Knowing when to use which tool will make your task more efficient.
Tool maintenance is also crucial. Clean your tools after each use to prolong their life and maintain their effectiveness. For instance, wash and dry roller brushes thoroughly to prevent sealant build-up that could compromise future applications.
Similarly, clean the caulk gun nozzle to prevent hardened sealant from blocking it.
Safety Precautions With Tools
When dealing with tools for basement waterproofing, it’s crucial to prioritize safety above all else. Tool safety isn’t something to take lightly; mishandling tools can result in severe injuries. Always remember to use the right tool for the task at hand. For instance, don’t use a screwdriver as a chisel or a wrench as a hammer.
Another aspect of tool safety is keeping your tools in good condition. Regularly inspect your tools for any damage or wear and tear. Damaged tools can be hazardous and less effective, so make sure to replace or repair them promptly.
Protective gear plays an essential role in ensuring your safety. Don’t overlook the importance of wearing safety glasses to protect your eyes from flying debris. Use gloves to protect your hands from sharp edges and harsh chemicals. If you’re dealing with noisy equipment, ear protection may be necessary.
Lastly, always maintain a clean workspace. Cluttered areas can lead to accidents, like tripping over a tool. Store your tools properly when not in use.
Following these safety precautions won’t only protect you from potential hazards but also make your basement waterproofing project a success.
Step 2: Implementing Waterproofing Solutions
Every home deserves a protective shield and this is where waterproofing solutions come into play. Your basement needs an effective drainage system, the first line of defense against water intrusion. With proper exterior drainage, you’re preventing the accumulation of water around your house’s foundation, which can lead to severe damage over time.
Another essential step is to implement moisture barriers and vapor barriers. These barriers are designed to keep unwanted moisture out of your basement, ensuring it remains dry and free from potential water damage.
Wall insulation also plays a significant role in this process, adding an extra layer of protection against moisture.
Foundation sealing is an essential part of waterproofing. This involves applying a sealant to the walls and floor of your basement to prevent water from seeping in. In addition to this, interior coatings can be applied to further strengthen your basement’s defenses.
When it comes to flood prevention, sump pumps are your best friend. They’re designed to pump out water that’s accumulated in your basement, keeping it dry even during heavy rainfalls.
Lastly, landscape grading ensures that water flows away from your home, rather than pooling around it.
Choosing the Right Waterproofing Materials
After setting up the right solutions for your basement, you’ll need to decide on the best materials to use for waterproofing. The selection of material types is critical, as it directly impacts the effectiveness of the waterproofing methods applied. You’ve got a variety of options, from liquid membranes to sheet-based barriers.
Longevity factors play a significant role in materials selection. Opt for materials that can withstand extreme conditions over a long period, enhancing your basement’s durability. Performance ratings should guide your choice, as they indicate how well the material can resist water penetration.
Cost considerations can’t be overlooked. While it’s tempting to go for the cheapest option, remember that you’re also paying for quality. Balance affordability with performance and longevity to get the most value.
Environmental impacts are another aspect to consider. Choose materials that are eco-friendly and cause minimal harm to the environment.
Installation techniques also vary with material types. Some might require professional help while others you can install yourself.
Lastly, factor in maintenance requirements. Some materials may necessitate regular upkeep, adding to the overall cost. Choose wisely to ensure your basement stays dry and your wallet, happy.
Step 3: Final Inspection and Sealant Application
Now that you’ve selected the best waterproofing materials, it’s time for a final inspection before applying the sealant. This step is crucial to ensure long term durability and to make the most of your product selection. Your inspection checklist should include surface preparation, making sure the surface is dry and clean. Any moisture left behind might hinder the effectiveness of your moisture barriers.
Consider the following points in this process:
- Sealant Types: You’ve likely chosen between a liquid membrane, bituminous coating or a cementitious coating. Each sealant has specific application techniques that you should follow for optimal results.
- Application Timing: Timing is vital. The weather and temperature can impact the sealant’s effectiveness. Always follow the manufacturer’s guidelines on this.
- Effectiveness Testing: After application, give the sealant time to dry and then test its effectiveness. There are several sealing methods available, and some might require additional testing.
Post-application, anticipate a dramatic reduction in moisture and dampness. However, remember that even the best sealant application won’t last forever. Regular maintenance and inspections are key to maintaining a dry basement.
Post-Waterproofing Maintenance Tips
Now that your basement’s waterproofing is completed, let’s talk about keeping it in great shape.
Regular inspections are key to maintaining this level of dryness and dealing with any potential leaks.
You’re going to find the following tips helpful in preserving the integrity of your waterproofing job.
Routine Basement Inspections
Don’t rest on your laurels once your basement is waterproofed. It’s essential to establish a routine inspection plan to ensure the longevity of your waterproofing system.
A waterproofed basement isn’t a one-and-done deal. It requires regular check-ups to ensure that the drainage solutions and moisture barriers are holding up as they should.
Routine inspections allow you to:
- Monitor the Effectiveness of the Drainage Solutions: It’s important to regularly check that your drainage solutions are still working efficiently. Look for any signs of blockages or damage that could compromise their functionality.
- Check the Integrity of the Moisture Barriers: Moisture barriers play a vital role in keeping your basement dry. Regular inspections will help you detect any potential breaches early on.
- Maintain the Overall Health of Your Basement: Through regular inspections, you can catch and address minor issues before they escalate into major problems.
Ensure you’re proactive in maintaining your waterproofed basement.
Handling Potential Leaks
Even with diligent inspections and a solid waterproofing system, you may still encounter leaks in your basement. Don’t panic. It’s crucial to respond quickly and utilize effective repair techniques to prevent further damage.
A good first step is leak detection. Pay attention to signs such as damp spots, mold growth, or a musty smell. These may indicate a hidden leak. Once you locate the leak, decide whether it’s a DIY fix or if you need professional help.
Here’s a quick guide in markdown format to help you handle potential leaks:
| Action | DIY | Professional |
|---|---|---|
| Leak Detection | Look for damp spots, mold, musty smell | Use advanced tools for precise detection |
| Repair Techniques | Use sealants or patches for minor leaks | Can handle complex repairs, replace portions of wall |
| Maintenance | Regularly check for signs of damage | Schedule routine maintenance checks |
Regardless of the severity, always act fast when you spot a leak. Remember, your basement’s health is integral to your home’s overall condition. By staying vigilant, you’ll save on costly repairs and maintain a safe, dry basement.
Signs Your Basement Needs Re-Waterproofing
Without a doubt, your basement plays a crucial role in maintaining the overall structural integrity of your home.
However, it could be crying out for help, showing signs that it needs re-waterproofing. It’s important to recognize these signs early to prevent potential damage.
- Mold Growth Just like a detective, you’ve got to look for clues. Mold growth is one of the most telling signs that your basement needs re-waterproofing. It’s an indication that moisture is seeping through the walls or floor, providing a conducive environment for mold to thrive.
- High Humidity Levels If your basement feels more like a sauna, it’s a red flag. High humidity levels often suggest that your basement’s waterproofing system isn’t doing its job effectively. A hygrometer can help you measure the humidity levels accurately.
- Water Stains Lastly, water stains on the walls or floor are clear evidence of water intrusion. These unsightly marks may start small but can rapidly grow if left unchecked.
Don’t turn a blind eye to these warning signs. Act promptly to re-waterproof your basement and protect your home’s structural integrity.
Frequently Asked Questions
What Is the Average Cost of Basement Waterproofing?
The average cost of basement waterproofing can vary greatly.
It’s influenced by several cost factors like the size of your basement, the severity of the water problem, and the method of waterproofing used.
DIY options may save you some money upfront, but they aren’t as reliable long-term.
So, it’s often better to hire professionals.
How Long Does the Waterproofing Process Typically Take?
You’re likely wondering how long the waterproofing process normally takes.
It generally depends on the severity of your basement moisture problem and the kind of drainage solutions required.
However, a standard waterproofing job can be completed in 1 to 3 days.
Keep in mind, more complex issues may necessitate a longer timeframe.
It’s best to consult with a professional for an accurate estimate based on your specific situation.
Will Waterproofing Increase the Value of My Home?
Absolutely, waterproofing your basement can significantly increase your home’s value.
It’s not just about preventing future damage; it’s an investment in increased equity and resale potential.
Buyers prefer homes that are well-maintained and problem-free.
So, by waterproofing your basement, you’re enhancing your home’s appeal, making it more attractive to potential buyers.
In essence, you’re not just protecting your home – you’re boosting its worth.
Can I Live in My House During the Basement Waterproofing Process?
Yes, you can live in your house during the basement waterproofing process.
However, you might need to consider temporary relocation due to potential noise concerns. The process could be noisy and may disrupt your daily activities.
But rest assured, professionals work efficiently to minimize any inconvenience.
It’s also crucial to keep the work area clear for the workers’ safety and the effectiveness of the process.
Does Basement Waterproofing Come With a Warranty or Guarantee?
Yes, you’ll find that most basement waterproofing services come with a warranty or guarantee.
The warranty coverage varies, so it’s important to clarify this before work begins. Guarantee types can range from covering labor and materials to addressing potential future leaks.
It’s your assurance that the company stands behind their work, giving you peace of mind that if issues arise later, they’ll be handled at no extra cost to you.
So, don’t let basement water issues dampen your home’s potential. Our proven 3-step process will tackle those pesky leaks, protect your property’s value, and provide peace of mind. From initial assessment to maintenance, we’ve got you covered. Remember, waterproofing isn’t a one-time thing, it requires regular check-ups. Stay vigilant for signs of re-waterproofing needs and enjoy the comfort of a dry, functional basement. Start safeguarding your home today!

Budget Dry is based in Killingworth, Connecticut and has been recognized as the areas leading basement waterproofing and foundation repair company.
We are passionate about providing the absolute best service to each home and homeowner we encounter, because we understand just how important your home is to you. We pride ourselves on our excellent customer service and use of cutting edge industry technology.
Budget Dry Basement Waterproofing is a leader in Basement waterproofing and basement restoration. Every Basement flood, leak or crack is evaluated thoroughly to ensure that we provide you with the best solution. So you can be secure and confident in the knowledge that Budget Dry treats the problem, not the symptom!